Using DataLad & PyBIDS with BIDS
This tutorial is a gentle, end-to-end guide that shows you how to:
install the right tools (DataLad, git-annex, and Python packages)
clone (download) a BIDS dataset with DataLad
retrieve only the files you need (on demand)
use PyBIDS to run practical queries (subjects, sessions, files, metadata, events)
optionally interact with derivatives (e.g., preprocessed fMRI)
It assumes very little prior knowledge of Git, DataLad, or BIDS. You can copy-paste commands as you go.
Prerequisites & Installation
You’ll need three things:
Git and git-annex (DataLad uses these under the hood)
DataLad (command-line tool for versioned data)
Python with PyBIDS (to query BIDS), plus a few helpers (pandas, numpy, nibabel)
Choose your platform below.
Linux (Debian/Ubuntu)
sudo apt-get update
sudo apt-get install -y git git-annex
# DataLad from apt (OK) or from pip/conda (often newer)
sudo apt-get install -y datalad

# Create/activate a clean Python environment (recommended)
sudo apt-get install -y python3-venv
python3 -m venv ~/envs/bids
source ~/envs/bids/bin/activate
python -m pip install --upgrade pip
python -m pip install pybids pandas numpy nibabel
Linux (RHEL/CentOS/Fedora)
sudo dnf install -y git git-annex
# Install/upgrade Python venv tools if needed
python3 -m venv ~/envs/bids
source ~/envs/bids/bin/activate
python -m pip install --upgrade pip
python -m pip install datalad pybids pandas numpy nibabel
macOS (Homebrew + Python venv)
# Install Homebrew from https://brew.sh if you don't have it
brew update
brew install git git-annex datalad

python3 -m venv ~/envs/bids
source ~/envs/bids/bin/activate
python -m pip install --upgrade pip
python -m pip install pybids pandas numpy nibabel
Conda (any OS)
conda create -n bids python=3.11 -y
conda activate bids
conda install -c conda-forge git git-annex datalad -y
pip install pybids pandas numpy nibabel
Tip
Alpine Linux users: packaging for git-annex can be tricky. Using conda (above) is often the simplest path.
Verify installs
git --version
git-annex version
datalad --version
python -c "import bids, pandas, numpy, nibabel; print('OK')"
Key Concepts (Plain Language)
BIDS is a standard folder layout and naming scheme for MRI/MEG/EEG datasets. Example:
sub-XXXX/ses-YY/anat/*T1w.nii.gz,func/*_bold.nii.gz. Each image typically has a matching.jsonwith metadata.DataLad adds version control for data. It builds on Git (for small text files) and git-annex (for large data). With DataLad you can:
clone a dataset quickly (you get metadata and file names first)
get the actual large files on demand
drop files you don’t need (save space; you can get them again later)
PyBIDS lets Python understand BIDS. You can ask questions like:
“Which subjects do I have?”
“List all BOLD files for task ‘rest’.”
“Give me the metadata (TR, EchoTime) for this file.”
“Where are the events TSVs for each run?”
Create a Workspace
Pick a working directory (anywhere you have space):
mkdir -p ~/work/bids-demo
cd ~/work/bids-demo
Clone a BIDS Dataset with DataLad
For this step you will need to refer to the following tutorial in order to gain access to the BIDS dataset for University of Calgary’s CPIP project.
How to access data from the Canadian Paediatric Imaging Platform
GitLab serves as a catalogue for the Canadian Paediatric Imaging Platform (CPIP) data. Currently, these data lives inside the University of Calgary’s network, so you will need to follow these instructions to get it.
You will need to log into the General VPN access through FortiClient, contact Perry.radau1@ucalgary.ca or Milton.camachocamach@ucalary.ca if you need help with any of these steps.
To access data from the Canadian Paediatric Imaging Platform you will need to work with two software’s, GitLab and MinIO.
GitLab
GitLab tracks the structure and history of the repositories, or in our case, the study directory hierarchy. The hierarchy of directories inside of GitLab is defined in this order: Principal Investigator / Study Name / (bids, sourcedata, qc, derivatives). Principal investigator (PI) will be the investigator who is heading the study. Study Name will be the name of the study or studies which are under the PI. Under each independent study you will find 4 different repositories containing study specific data. The sourcedata repository will be the one keeping track of all the DICOM files of the study. The bids folder will keep track of the BIDS formatted images for the study. The qc repository will keep track of the quality control checks for the data of the study, and the derivatives repository will be where you can find processing steps for the bids formatted data.
MinIO
MinIO will serve as the object storage for all the data for the repositories in GitLab. In short, GitLab tracks the file’s history and the structure while MinIO stores all the images and binary objects (all non-text files).
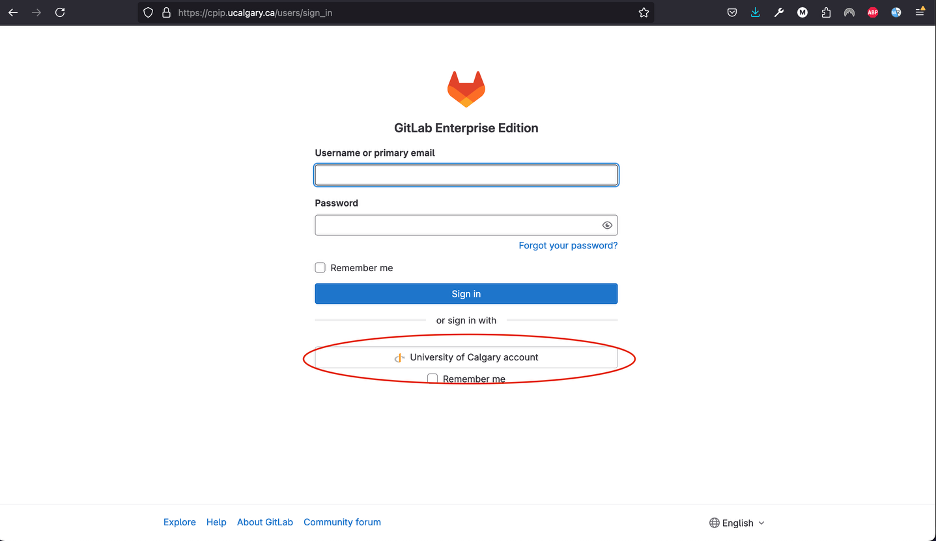
You can access it by clicking cpip.ucalgary.ca or copy/pasting it into your browser (Chrome and Mozilla have been tested). You will see following window.
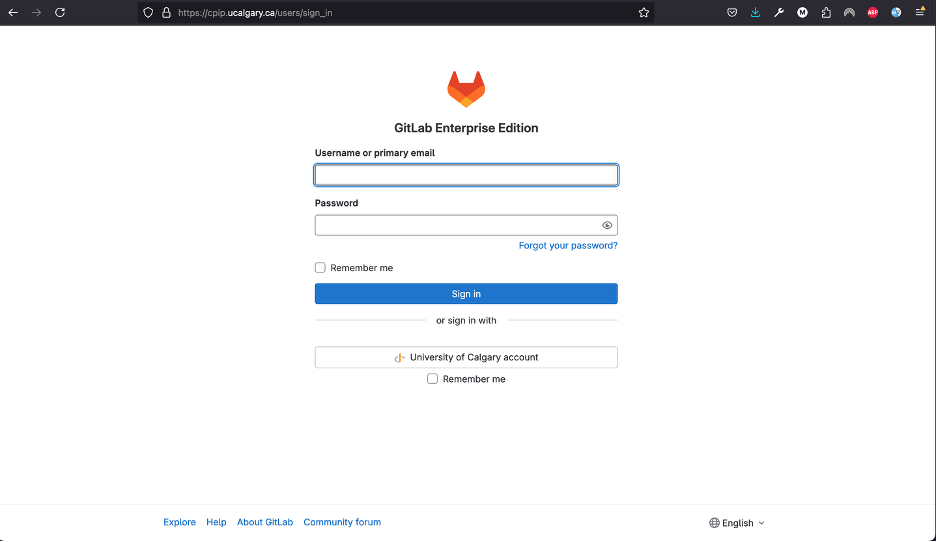
To log in using your UofC’s credentials, you will need to click in the University of Calgary’s account button and follow the instructions to log in to your account.
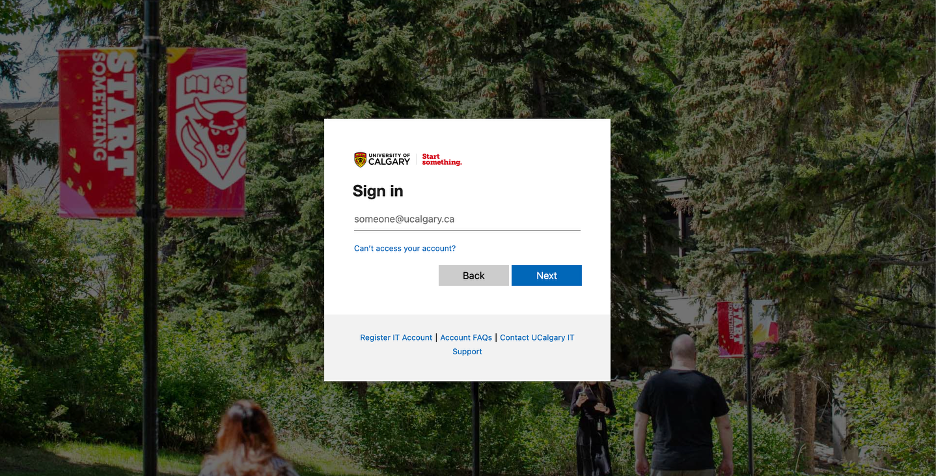
If you get an error message saying you do not have access, you must email Milton.camachocamach@ucalgary.ca to request access.
You will arrive to the following page:
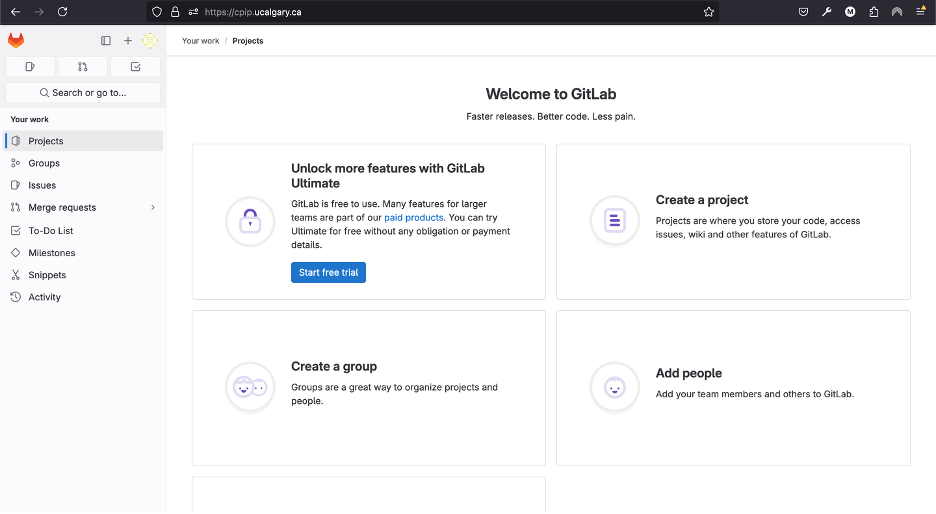
At this point you will need to contact the cpip data manager for Calgary (Milton.camachocamach@ucalgary.ca) so you can request access to the required projects and groups. It is very important to let the manager know which studies you are trying to access, otherwise it is possible that you will not have the correct permissions. Please also CC the responsible PI of the study as they will be the ones giving final approval for your access to be granted.
To clone the data and authenticate access to any repository you will need to create a personal access token by carefully following these instructions:
Click on your profile icon.
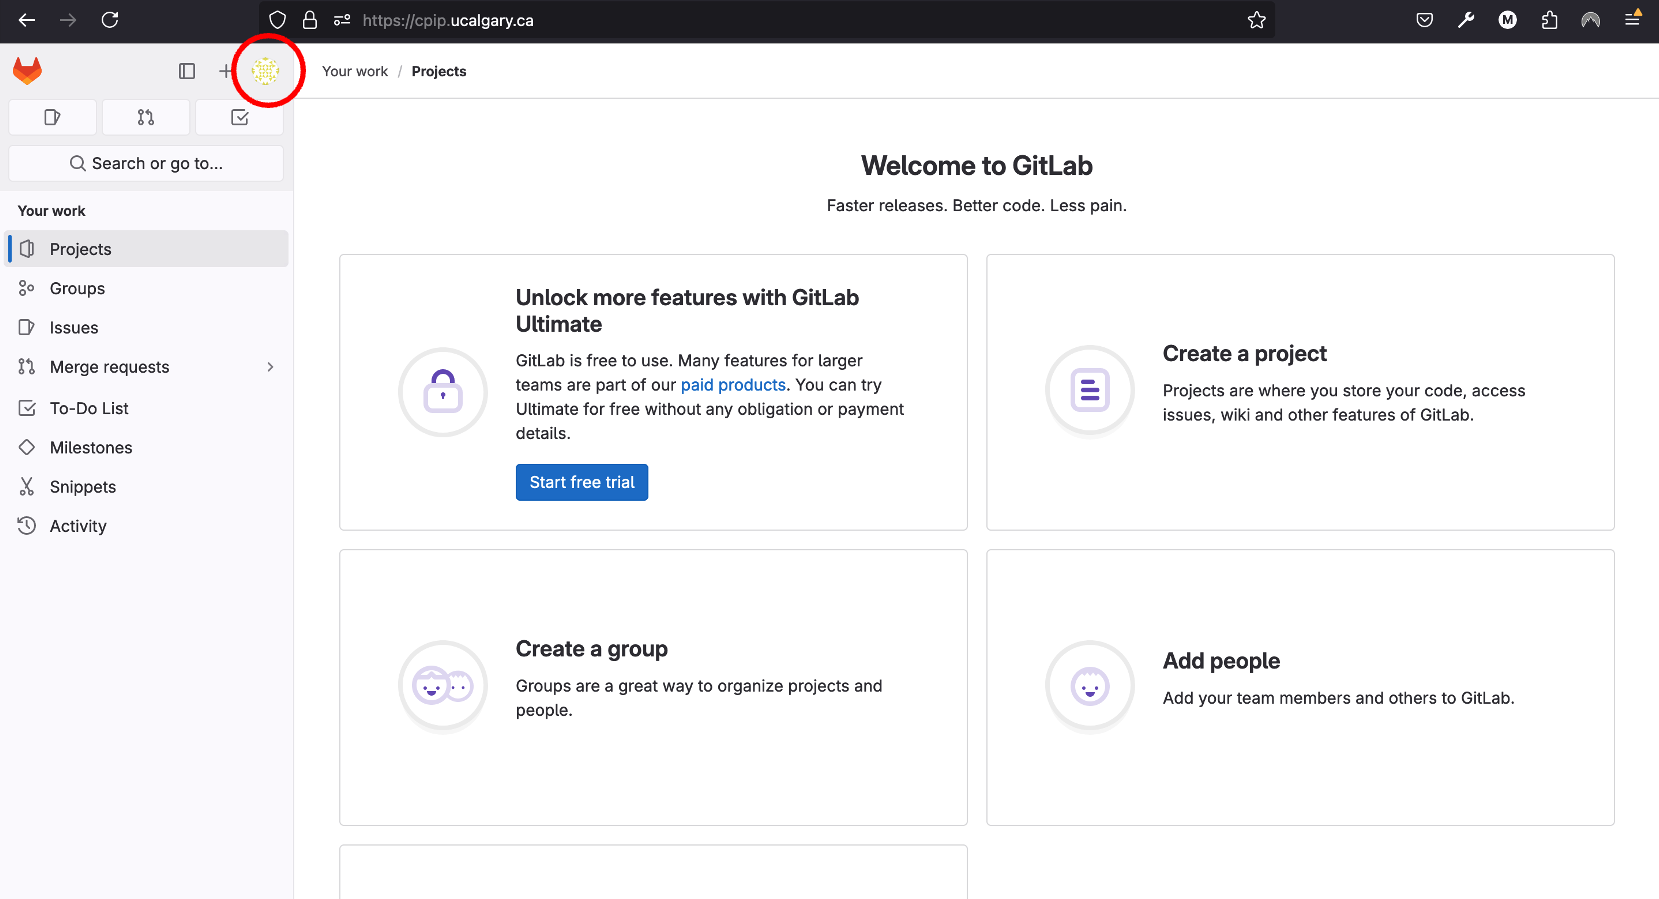
Click on
Preferences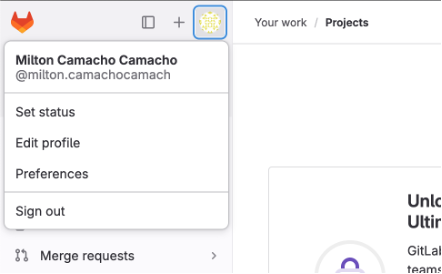
Navigate to the Access Tokens tile and then click on
Add new token.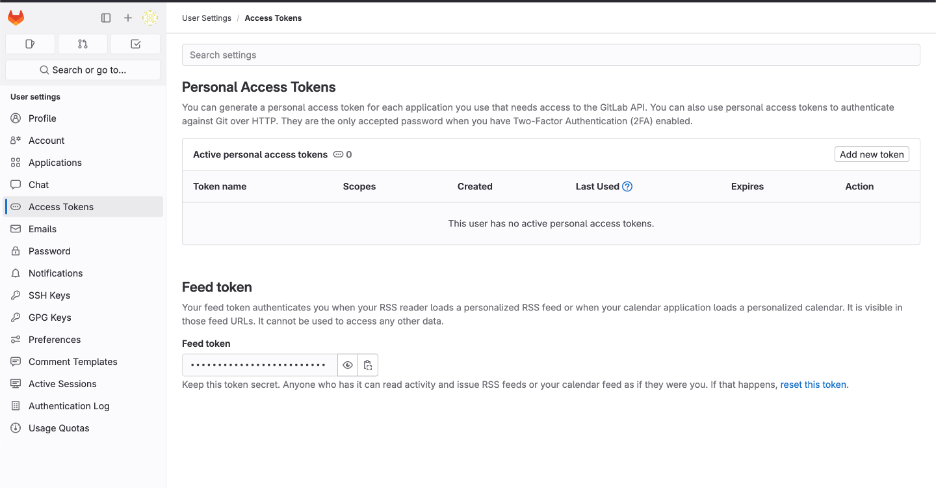
Name the token however you want. Set the date for expiration for little under a year from the current date (GitLab does not support over a year), and check the following boxes. You can create multiple ones with different levels of permission, but for the purposes of CPIP it is simpler to have a master access token.

You will need to safely store your personal access token right after creation as you will not be able to access it again. (don’t worry too much, you can always create a new one if you lose that one, but always keep it safe)

Just like we created a token for GitLab, we will create another token but this time for MinIO. Once again, make sure the CPIP manager knows what you are trying to access. If you already did this, good job. Please continue with the steps.
Go to your web browser (firefox or google chrome) and navigate to cpip.ucalgary.ca:9001 and you will get to this page and you will need to click on
UofC OpenID.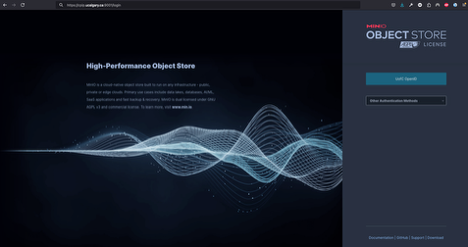
Similarly to what we did for GitLab, you will use your UofC credentials to access the MinIO. If you encounter issues doing this, contact the cpip data manager (Milton.camachocamach@ucalgary.ca).
Once inside the MinIO console, you will navigate to
Access Keys: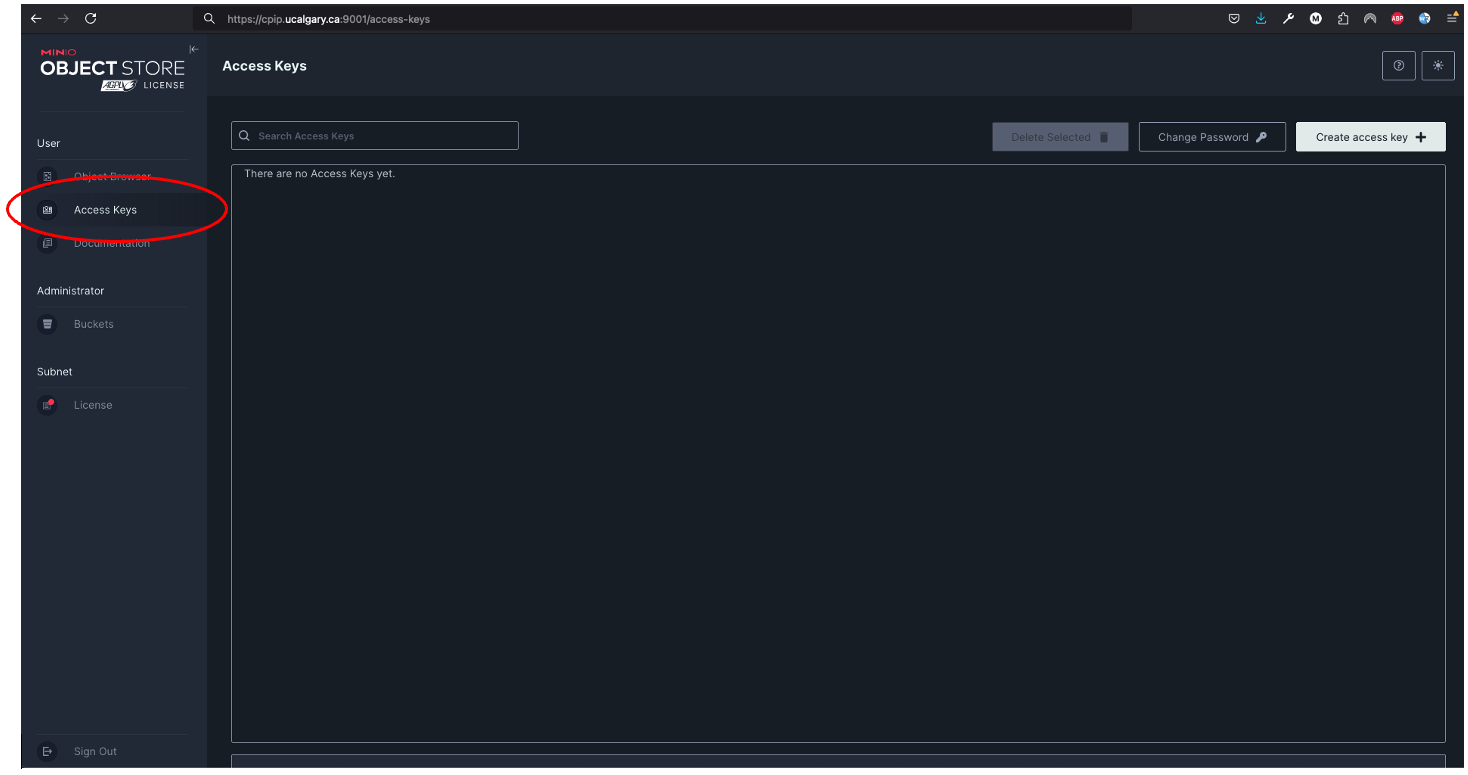
On the
top rightyou will click onCreate access key: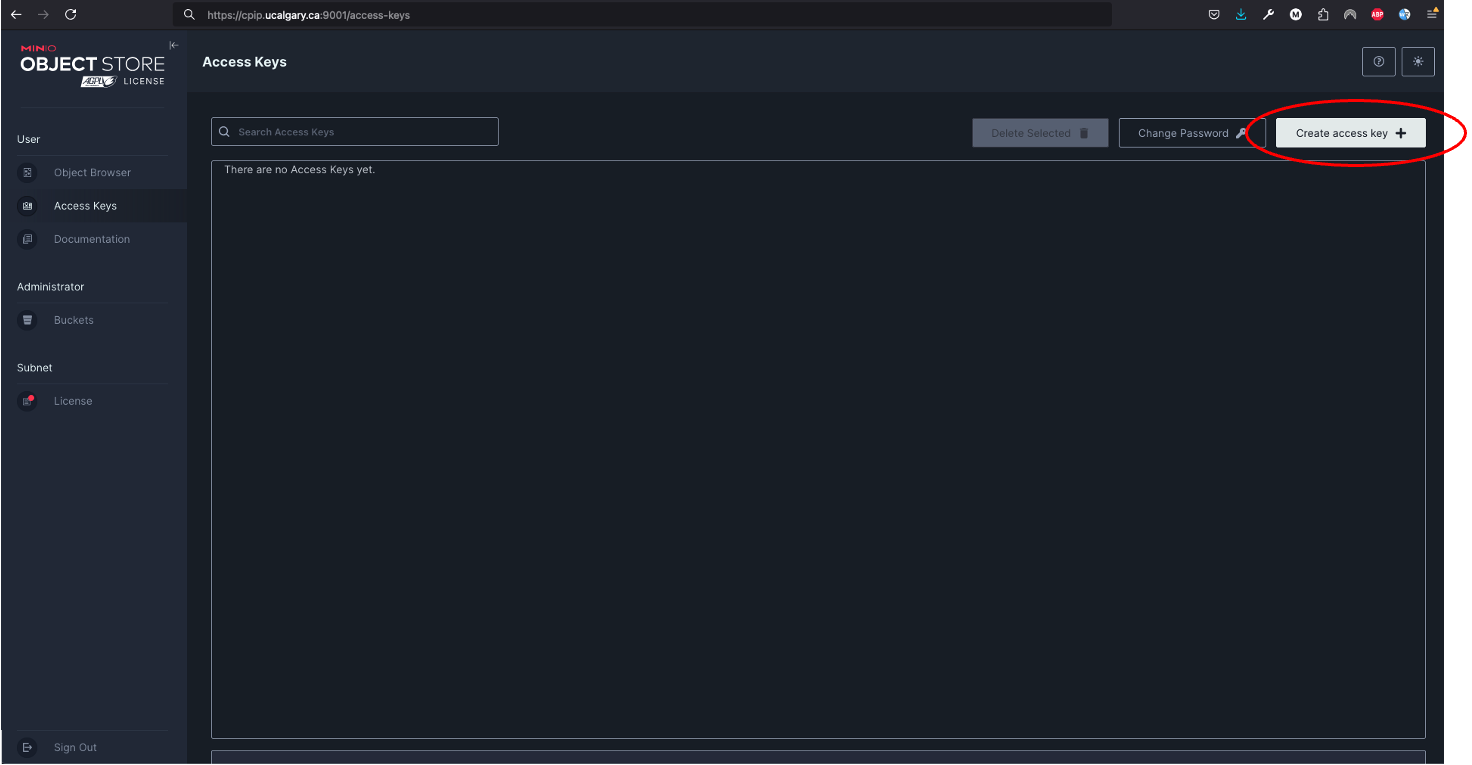
You will fill in the
access keyandsecret keyor accept the ones autogenerated in place, these will be used to access the data later. You could use your UofC credentials, but this is not advised. Set the name of the access key to whatever you want andclick on create. The name will only help you differentiate if you want to create multiple access keys with differential access levels. However, the cpip data manager advised by the CPIP principal investigator will ultimately determine what your access level will be.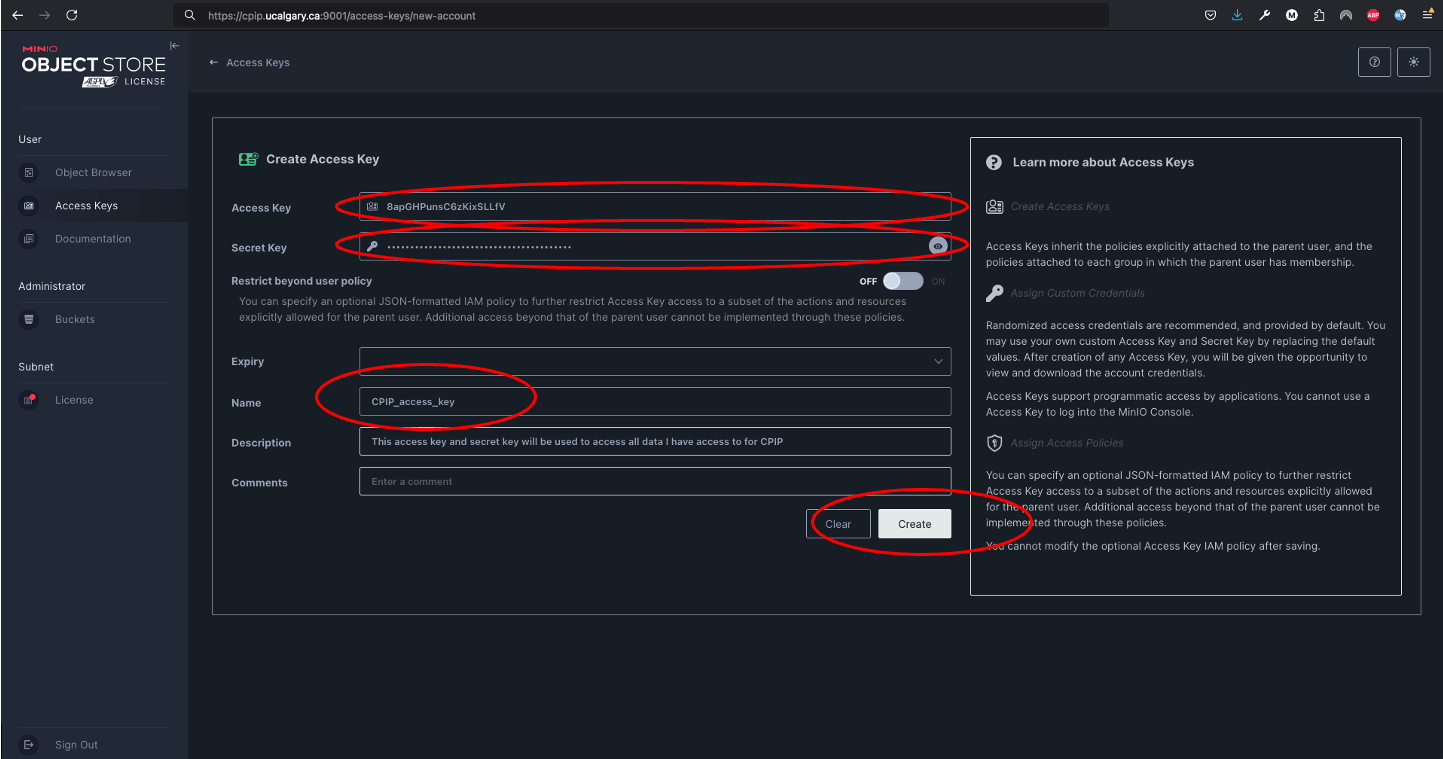
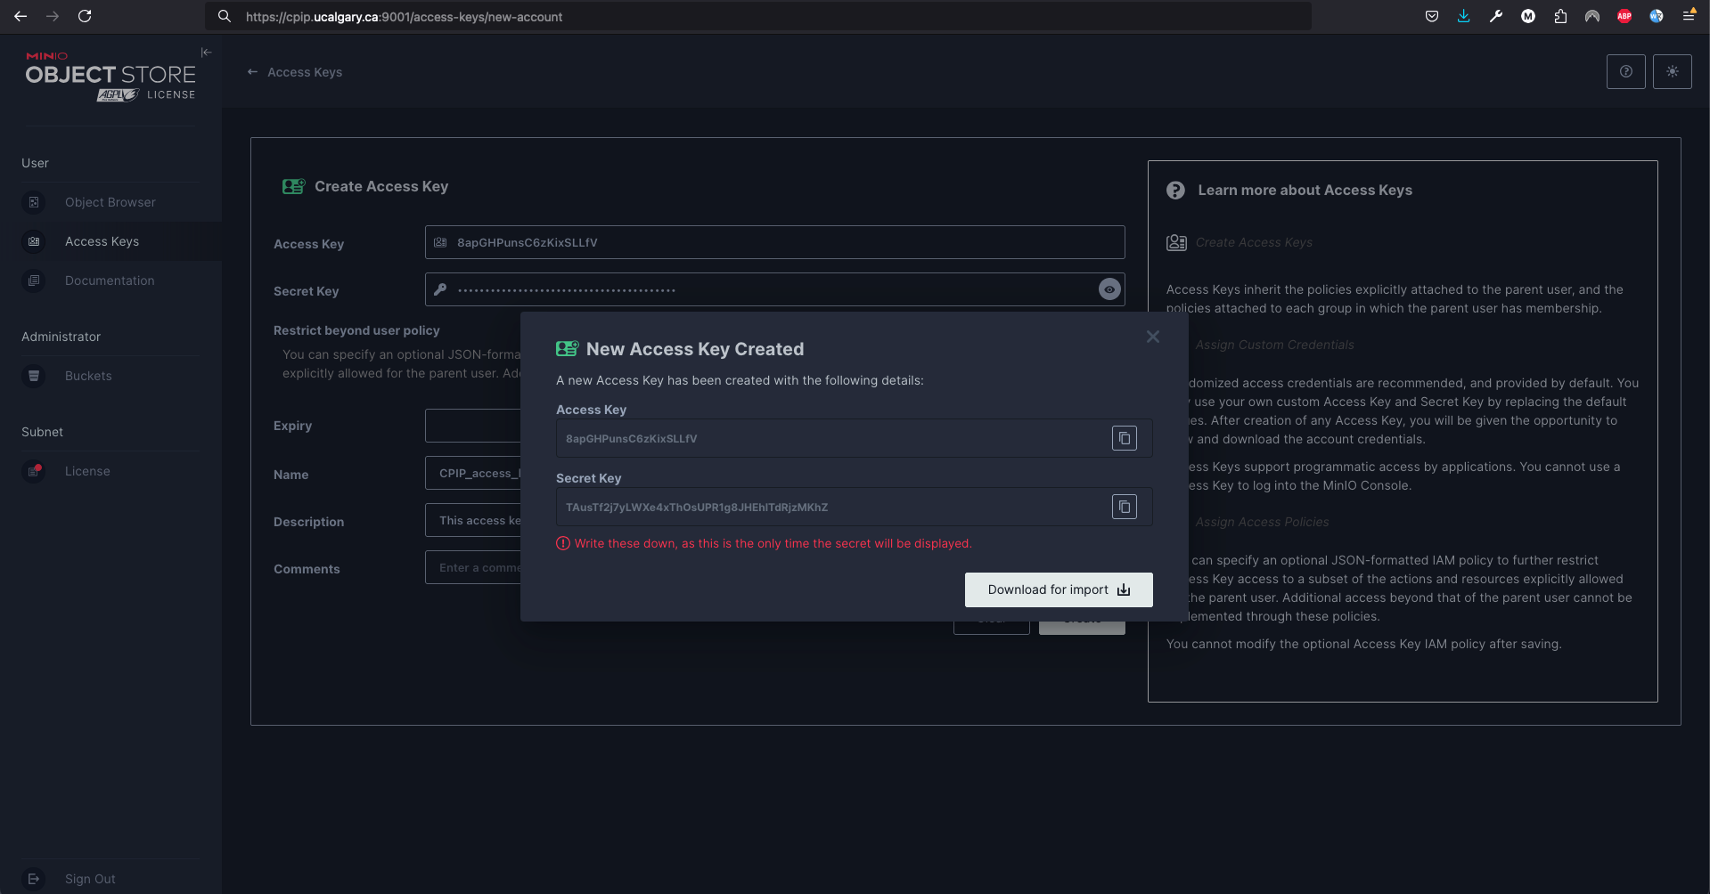
Similarly to what was done for GitLab, you will safely store this access key, but don’t worry if you lose it, you can create a new one a remove the previously created one at any moment.
Once you have created a personal access token for GitLab and the access key and secret key for MinIO you can use it to clone projects locally.
Click on the
GitLab iconon thetop leftpart of the screen and navigate to theProjects tile.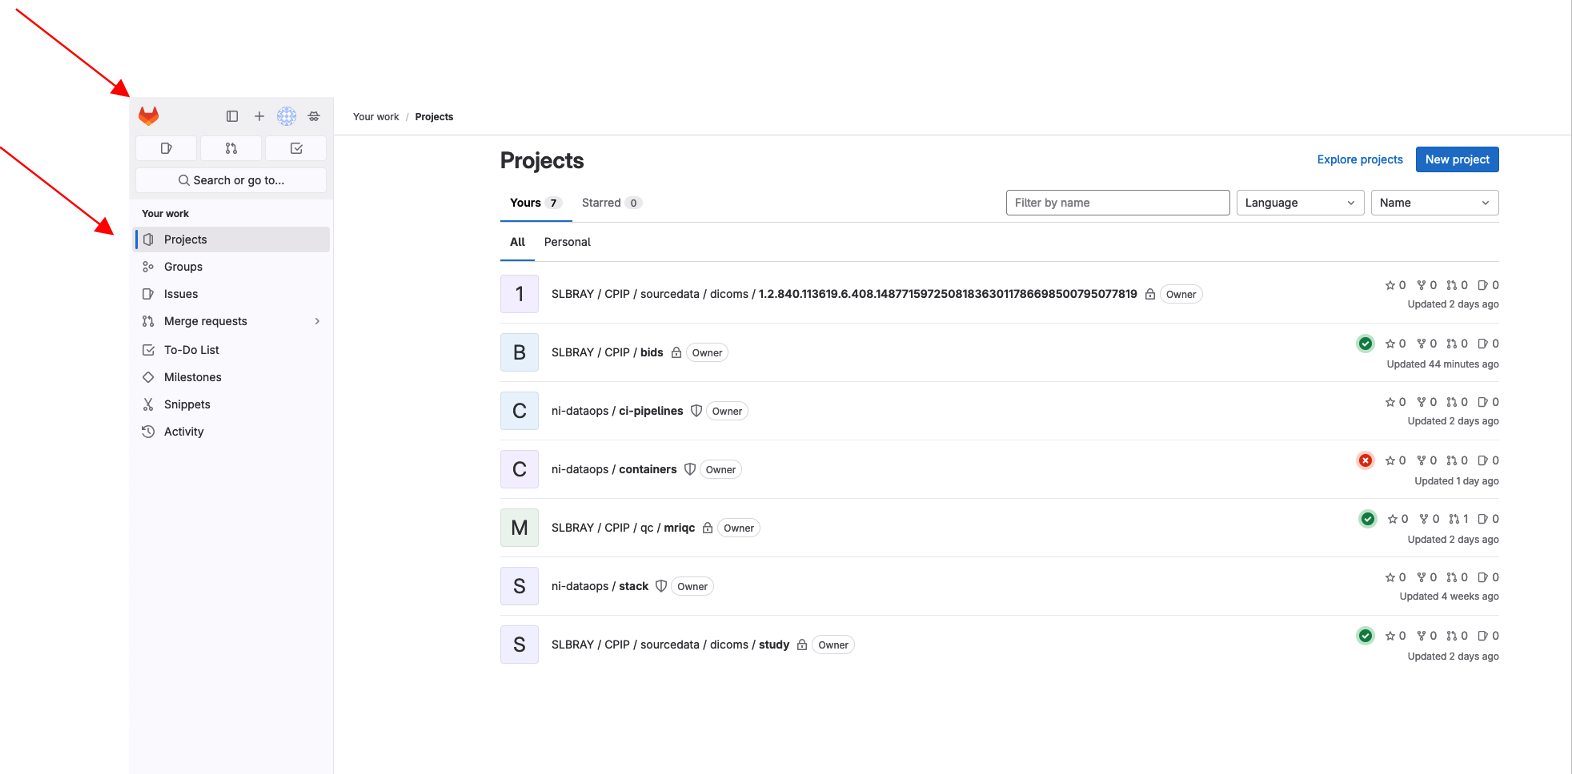
Navigate to the project you are interested in cloning e.g., the
bidsproject underSLBRAY/CPIP/bidsand click on it. This repository will contain all the bids data.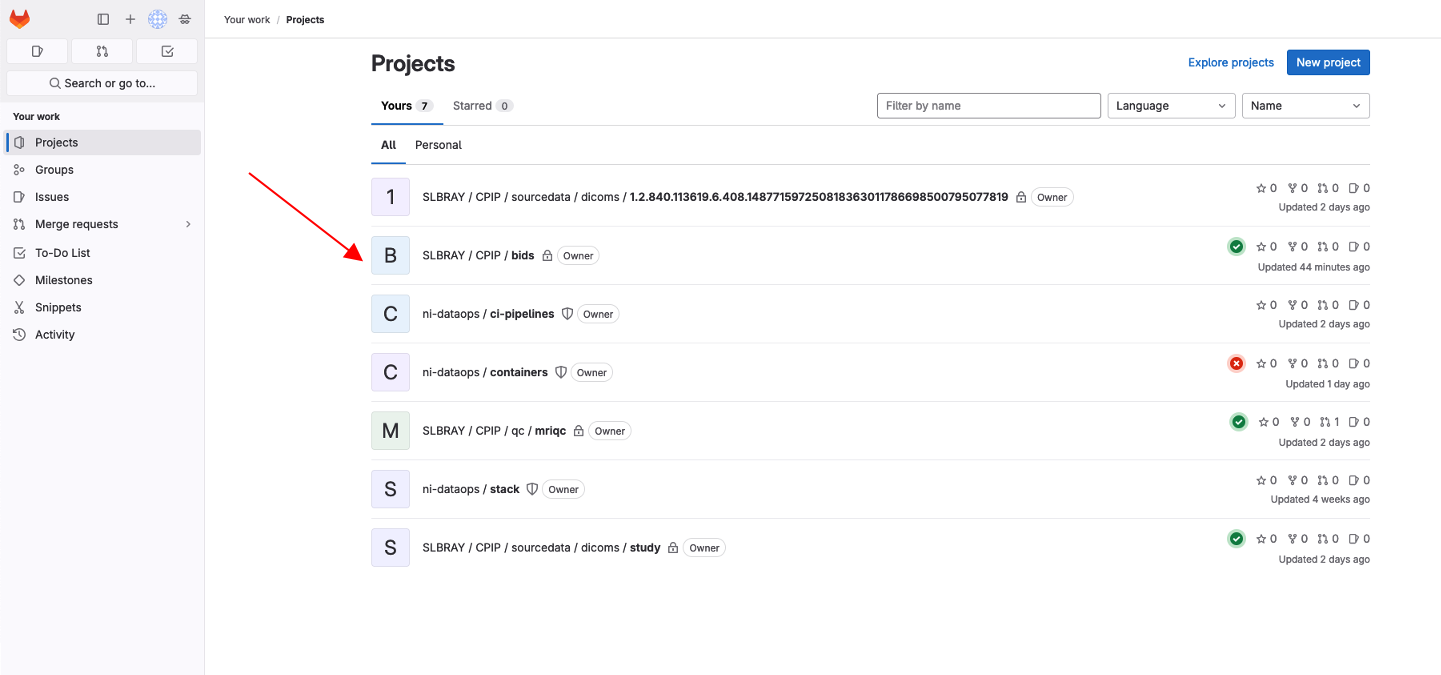
The project page will open, and you can navigate it and click in the
Codebutton and then copy the URL under theClone with HTTPS.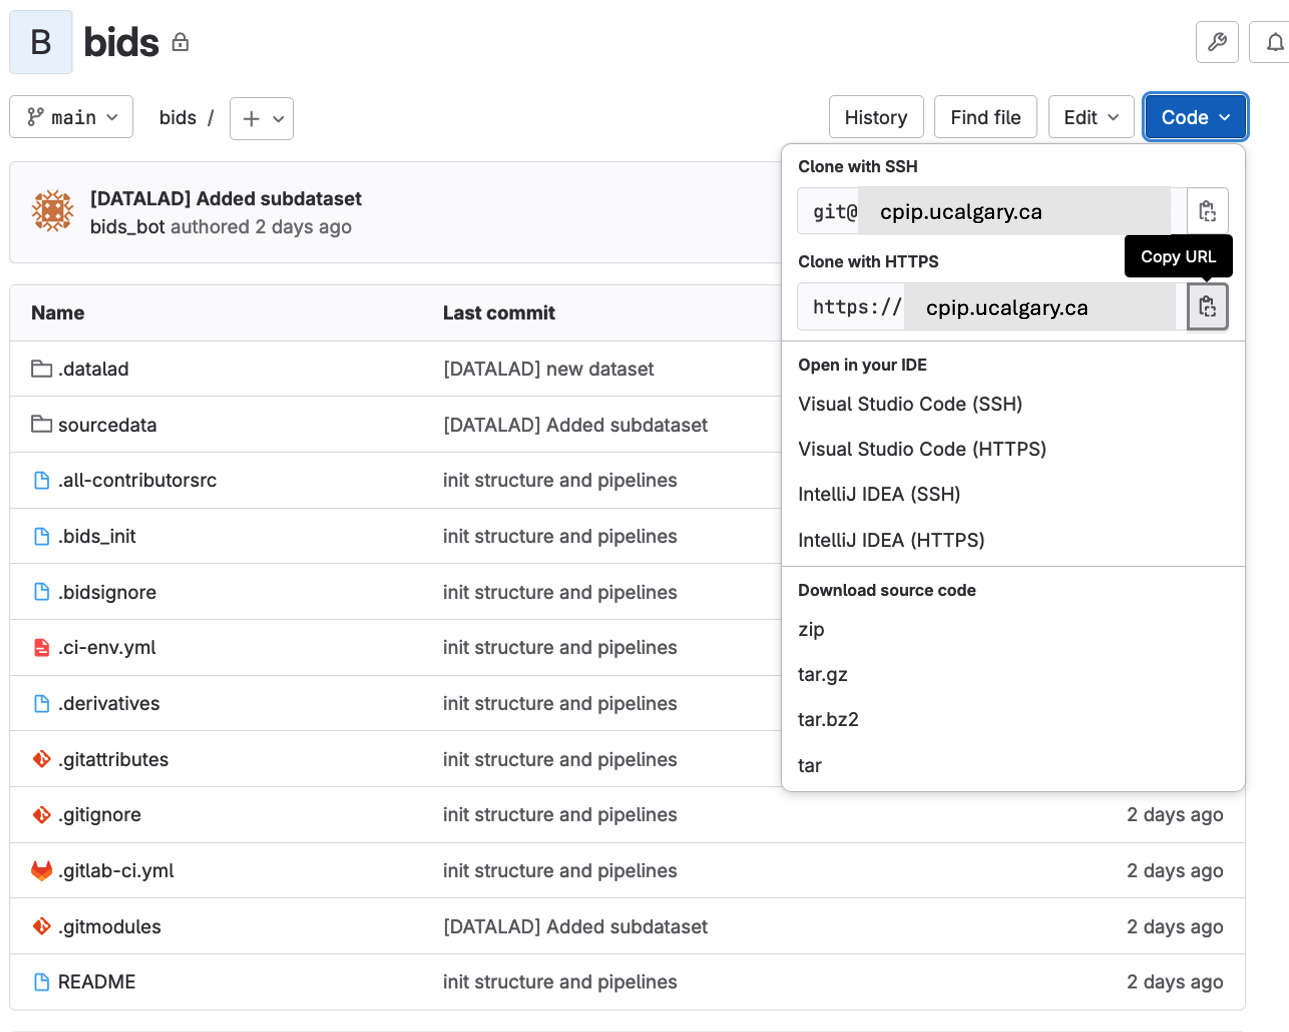
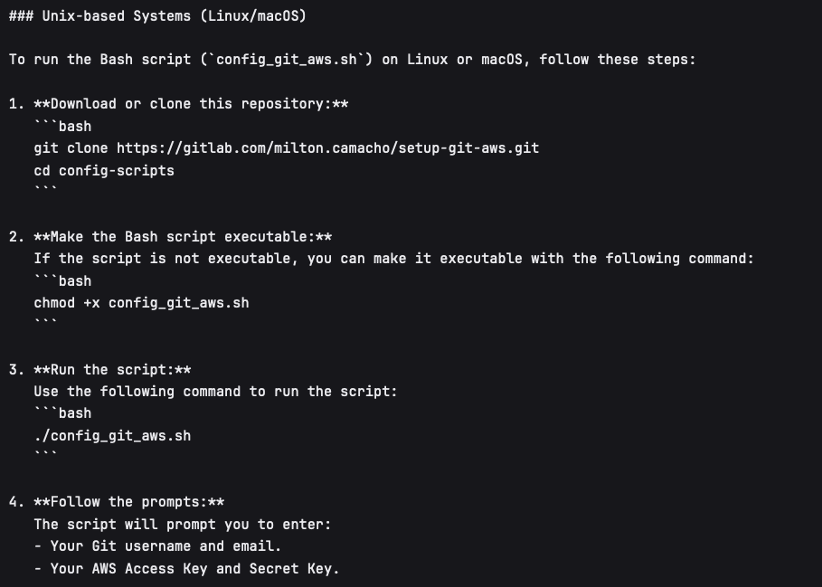
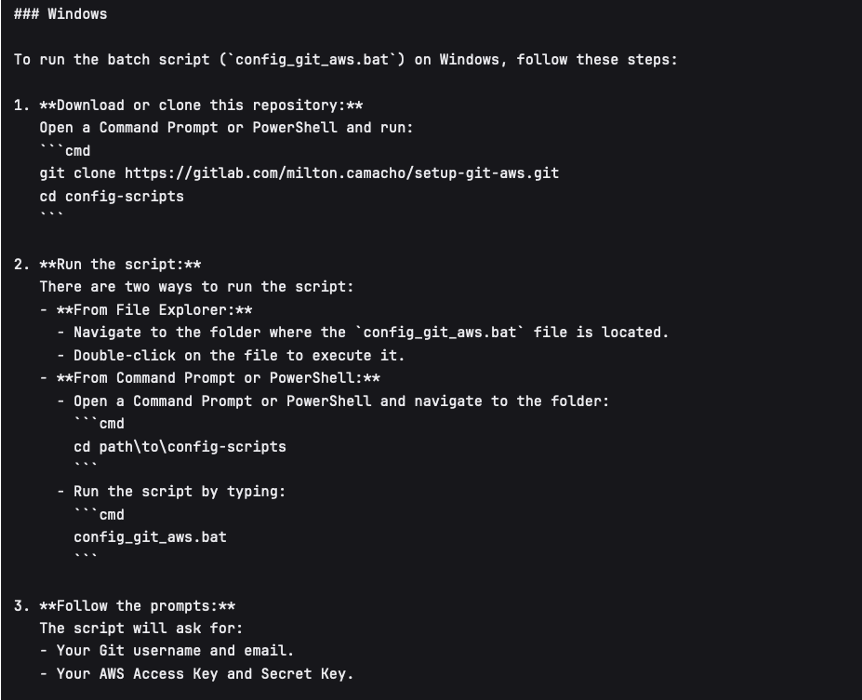
Open a terminal in Unix based systems or the CMD in windows (not recommended to use windows). Install the following open Git repository https://gitlab.com/milton.camacho/setup-git-aws.git. This repository will make it easy for you to set up your AWS credentials (``MinIO ``credentials in our case) in your system.
git clone https://gitlab.com/milton.camacho/setup-git-aws.git
Navigate into the installed repository (the directory where the previous repository was installed) and follow the README instructions in the repository. For convenience, I will attach a screenshot, but the instructions might have changes when you are trying to access the repository.
Using the same terminal or command window navigate to where you want to clone the bids repository. The commands will vary slightly depending on your operating system.
Now that you have completed the data access request, git configuration, and you have a dataset URL, this can be an SSH/HTTPS Git URL (but we will use HTTPS for CPIP as it is the only protocol supported), a local path, or an open-data URL.
Replace <BIDS_DATASET_URL> with your dataset’s URL in the following command.:
datalad clone <BIDS_DATASET_URL> bids-ds
You will be asked to authenticate (username (same as your UofC ID without the @ucalgary.ca) + personal access token (the one we generated for GitLab)) for GitLab. Hit enter and you will have installed repository.
cd bids-ds
What happened?
You now have the directory tree and file names, but many large files are annexed (placeholders).
That means the dataset cloned fast and uses little disk space initially which is conbenient for dataset exploration.
Explore structure:
datalad status
# If 'tree' is installed:
tree -L 3
# Otherwise:
find . -maxdepth 3 -type d -print
List subdatasets (e.g., derivatives as nested datasets):
datalad subdatasets
If you cannot find what you are looking make sure to check on other branches and repeat the previous exploration.
git branch -a
git checkout <name of branch>
# e.g. git checkout convert/CPIP10011.2.840.113619.2.25.4.2147483647.1719418303.832
Get Only What You Need
To actually download file content, use datalad get. You can be selective.
datalad automatically will read your MinIO credentials you set up ealrier in the tutorial. You can confirm this by running this in your terminal:
echo $AWS_ACCESS_KEY_ID
echo $AWS_SECRET_ACCESS_KEY
Note
If you did not set up the MinIO credentials, you can repeat the process How to access data from the Canadian Paediatric Imaging Platform section 9 e.
You can also run the following commands in your terminal (replace <your_access_key> and <your_secret_key> with the ones you created earlier):
export AWS_ACCESS_KEY_ID=<your_access_key>
export AWS_SECRET_ACCESS_KEY=<your_secret_key>
Example 1 — get a single file:
# 0001 is just a place holder, replace with a real subject ID
datalad get sub-0001/ses-*/anat/sub-0001_T1w.nii.gz
Example 2 — get all T1w images:
datalad get 'sub-*/ses-*/anat/*T1w.nii.gz'
Example 3 — get BOLD NIfTIs for a task:
datalad get 'sub-*/ses-*/func/*task-rest*_bold.nii.gz'
datalad get 'sub-*/ses-*/func/*task-rest*_bold.json'
Check where content lives (advanced, optional):
# 0001 is just a place holder, replace with a real subject ID
git annex whereis sub-0001/ses-*/func/sub-0001_task-rest_bold.nii.gz
Free space later (optional):
datalad drop 'sub-*/ses-*/func/*_bold.nii.gz' # files can be re-fetched any time
(Recommended) Set Up a Python Script for Queries
Create a small Python script as you go. In the dataset root (bids-ds), create queries.py:
# queries.py

from bids import BIDSLayout
import pandas as pd

# 1) Point to the dataset root. Set validate=True if you have a bids-valid repository.
# do not fret over this, you can still take advantage of the bids structure even if your bids data is not fully bids.
layout = BIDSLayout(".", validate=False)  # change to True if validator is available

# 2) Basic inventory
subjects = layout.get_subjects()
sessions = layout.get_sessions()
tasks = layout.get_tasks()

print(f"Subjects ({len(subjects)}):", subjects)
print(f"Sessions ({len(sessions)}):", sessions)
print(f"Tasks ({len(tasks)}):", tasks)

# 3) List all BOLD files (functional MRI time series)
bold_files = layout.get(suffix="bold", extension=[".nii", ".nii.gz"])
print(f"Found {len(bold_files)} BOLD files")
for bf in bold_files[:5]:
    print("BOLD:", bf.path)

   # bf.path will give you the full absolute path to the file

   # 3.5) You can also just get the file name directly
   print("BOLD:", bf.filename)

# 4) Get BOLD for a specific task (e.g., 'rest')
rest_bolds = layout.get(suffix="bold", task="rest", extension=[".nii", ".nii.gz"])
print(f"REST BOLD count: {len(rest_bolds)}")

# 5) Pick one file and read its metadata (TR, EchoTime, etc.)
if rest_bolds:
    f = rest_bolds[0]
    meta = layout.get_metadata(f.path)
    print("Example metadata for:", f.path)
    for k in ("RepetitionTime", "EchoTime", "TaskName", "PhaseEncodingDirection"):
        print(f"  {k}: {meta.get(k)}")

# 6) Find events TSVs (behavioral timings)
events = layout.get(suffix="events", extension=".tsv")
print(f"Events files: {len(events)}")
if events:
    e0 = events[0].path
    print("First events TSV:", e0)
    df = pd.read_csv(e0, sep="\t")
    print("Events columns:", list(df.columns))
    print(df.head())
Run it:
# Ensure your Python env is active if you created one earlier
python queries.py
If you see outputs listing subjects, tasks, BOLD files, and event columns, you’re golden.
Common PyBIDS Queries (Copy-Paste Snippets)
Initialize a Layout
from bids import BIDSLayout
layout = BIDSLayout("path/to/bids-ds", validate=False)  # or True if validator installed
Tip
The first run builds an index; subsequent runs are faster.
List Subjects, Sessions, Tasks
subs = layout.get_subjects()
sess = layout.get_sessions()       # may be [] if dataset has no sessions
tasks = layout.get_tasks()

print(subs)
print(sess)
print(tasks)
List BOLD Files (All or Filtered)
# all BOLD (NIfTI)
bold = layout.get(suffix="bold", extension=[".nii", ".nii.gz"])

# BOLD for a particular subject & task
# 0003 is just a place holder, replace with a real subject ID
bold_ses = layout.get(
    subject="0003",
    task="rest",
    suffix="bold",
    extension=[".nii", ".nii.gz"]
)

# Loop and print file paths + entities
for f in bold_ses:
    print(f.path, f.entities)
Get Metadata for a File
f = bold[0]
meta = layout.get_metadata(f.path)
print(meta.get("RepetitionTime"), meta.get("EchoTime"))
You can also do this:
f = bold[0]
RepetitionTime = f.entities.get("RepetitionTime")
EchoTime = f.entities.get("EchoTime")
print(RepetitionTime, EchoTime)
Find Events Files and Read Them with pandas
import pandas as pd

# 0003 and 1a are just place holders, replace with a real subject ID
events = layout.get(suffix="events", extension=".tsv", subject="0003", session="1a", task="rest")
for ev in events:
    df = pd.read_csv(ev.path, sep="\t")
    print(ev.path, df.shape, df.columns.tolist())
    # Example: filter a condition called 'trial_type'
    if "trial_type" in df.columns:
        print(df["trial_type"].value_counts())
List Anatomy (e.g., T1w)
t1s = layout.get(suffix="T1w", extension=[".nii", ".nii.gz"])
print(len(t1s))
for t in t1s[:5]:
    print(t.path)
Count Runs per Task (Simple Report)
import collections
counts = collections.Counter()

bold = layout.get(suffix="bold", extension=[".nii", ".nii.gz"])
for f in bold:
    task = f.entities.get("task", "NA")
    run = f.entities.get("run", "NA")
    sub = f.entities.get("subject", "NA")
    ses = f.entities.get("session", "NA")
    counts[(sub, task)] += 1

for (sub, task), n in sorted(counts.items()):
    print(f"sub-{sub}, task-{task}: {n} runs")
Working with Derivatives (Optional)
If your dataset includes BIDS derivatives (e.g., fMRIPrep output), enable them:
layout = BIDSLayout("path/to/bids-ds", derivatives=True, validate=False)

# Example: preprocessed BOLD in MNI space (nifti)
prebids = layout.get(suffix="bold", space="MNI152NLin2009cAsym",
                     extension=[".nii", ".nii.gz"])
print(len(prebids))

# Example: confounds TSVs (fMRIPrep)
confounds = layout.get(suffix="regressors", extension=".tsv")
for c in confounds[:5]:
    print(c.path)
Practical Workflow Tips
1) Don’t “download everything” by default
Use DataLad selectively:
For CPIP the JSON sidecars will be always available locally, so you can always get metadata without downloading large NIfTIs. Even if you are not working with CPIP data, you can still benefit from this approach.
# Only get JSON sidecars (metadata) for functional runs
datalad get 'sub-*/ses-*/func/*_bold.json'

# Only get events TSVs for “rest” task
datalad get 'sub-*/ses-*/func/*task-rest*events.tsv'
This is especially helpful for very large datasets.
1) Keep the BIDS dataset read-only
Treat the dataset as pristine input. Do your analysis in a separate directory (e.g., analysis/).
If you need persistent, reproducible steps, learn datalad run later (it records the exact command and inputs/outputs).
3) Speed up PyBIDS indexing (optional)
Point PyBIDS to a temporary cache directory with enough space.
Disable validation (
validate=False) when you trust the dataset.Index once; reuse the same layout object in a script.
Minimal “End-to-End” Example
This single script:
clones a dataset (if not already present)
gets only minimal files (metadata + events)
runs basic PyBIDS queries
prints a concise report
Save as demo.py in ~/work/bids-demo (replace the URL):
import os
import subprocess
from pathlib import Path
from bids import BIDSLayout
import pandas as pd

# --- 1) Clone if needed
url = "<BIDS_DATASET_URL>"
ds = Path("bids-ds")
if not ds.exists():
    print("[INFO] Cloning dataset…")
    subprocess.run(["datalad", "clone", url, "bids-ds"], check=True)

os.chdir(ds)

# --- 2) Get just what we need (metadata + events)
subprocess.run(["datalad", "get", "sub-*/ses-*/func/*_bold.json"], check=False)
subprocess.run(["datalad", "get", "sub-*/ses-*/func/*_events.tsv"], check=False)

# --- 3) PyBIDS queries
layout = BIDSLayout(".", validate=False)

subs = layout.get_subjects()
tasks = layout.get_tasks()
print(f"Subjects ({len(subs)}): {subs}")
print(f"Tasks ({len(tasks)}): {tasks}")

# Count runs per (subject, task)
from collections import Counter
counts = Counter()
for f in layout.get(suffix="bold", extension=[".nii", ".nii.gz"]):
    counts[(f.entities.get("subject"), f.entities.get("task"))] += 1

print("\nRuns per subject, per task:")
for (sub, task), n in sorted(counts.items()):
    print(f"  sub-{sub} | task-{task}: {n} runs")

# --- 4) Show example metadata + first rows of events
bold = layout.get(suffix="bold", extension=[".nii", ".nii.gz"])
if bold:
    f = bold[0]
    meta = layout.get_metadata(f.path)
    print("\nExample metadata:")
    for k in ("RepetitionTime", "EchoTime", "TaskName", "SliceTiming"):
        print(f"  {k}: {meta.get(k)}")

events = layout.get(suffix="events", extension=".tsv")
if events:
    e0 = events[0].path
    df = pd.read_csv(e0, sep="\t")
    print(f"\nFirst events file: {e0}")
    print(df.head())
Run it:
cd ~/work/bids-demo
# ensure your env is active
python demo.py
Note
You could replace the subprocess.run([...]) calls with equivalent Python APIs (e.g., datalad.api.clone(), datalad.api.get()) if you prefer but that involves another library to learn (this is recommented for more advanced use cases).
Troubleshooting
“git: command not found” / “git-annex not found”
Install them (see installation section). On Linux you often need sudo.
“get(error): sub-x/ses-x/dwi/sub-x_ses-x_*.nii.gz (file) [transfer already in progress, or unable to take transfer lock]”
If you see this error, it means that another process is/was already downloading the same file. I you are trying to download the same file in multiple terminal sessions, wait for the first one to finish. If you accidentally or deliveratly interrupted a download, you will have to first remove the git annex lock files before trying again. You can do this by running the following command in the root of the dataaset:
find .git/annex/transfer -type f -maxdepth 3 -delete
Then try again with your datalad get … command.
“datalad: command not found”
Install DataLad via your package manager or pip/conda (see above).
“datalad get … failed”
Check that you’re online and the dataset’s remote is reachable.
Try
git annex whereis <path>to see available remotes.If behind a proxy/firewall, configure Git accordingly.
“Permission denied” (on clone or get)
Ensure the URL is public or that you have credentials (for private repos).
For SSH URLs, set up your SSH key and agent.
Windows issues
Prefer WSL2 (Ubuntu on Windows) for best compatibility, especially with symlinks used by git-annex.
PyBIDS indexing seems slow
First run builds an index; later runs are faster.
Use
validate=Falseif you don’t need full validation.Limit queries (e.g., filter by subject/task) to avoid scanning everything.
Next Steps
Learn
datalad runto record analysis provenance (exact commands + inputs/outputs).Explore BIDS Derivatives deeply (e.g., confounds, spaces,
desclabels).Add bids-validator to catch BIDS issues early:
sudo npm install -g bids-validator   # requires Node.js
bids-validator .
Use PyBIDS BIDS-StatsModels (advanced) for standardized statistical model specifications.
Quick Reference (Cheat Sheet)
DataLad
Clone:
datalad clone <URL> <DIR>Get content:
datalad get <path-pattern>Drop content:
datalad drop <path-pattern>Status:
datalad statusSubdatasets:
datalad subdatasets
PyBIDS
from bids import BIDSLayout
layout = BIDSLayout("bids-ds", validate=False)

layout.get_subjects()
layout.get_sessions()
layout.get_tasks()

layout.get(suffix="bold", extension=[".nii", ".nii.gz"])
layout.get(suffix="events", extension=".tsv")
layout.get_metadata("/full/path/to/file.nii.gz")
You’ve now got a complete workflow: clone a BIDS dataset with DataLad, fetch only what you need, and query it with PyBIDS. From here, you can plug the queried file paths and metadata straight into your analysis pipeline.